


TGB/Tutorials/The Game of Life
From TDN
 |
[edit] The Game of Life Tutorial
Written for TGB Version: 1.7.5 Note: To learn how to integrate C++ sources in the TGB engine, please see the Fill Battle Tutorial Comments, questions ?: Please use this forum Source files : Download source files and executable from here |
Getting started
Start Torque Game Builder and create a new project. Then choose Save from the menu, enter a name for you level file and...exit. Yes, we will not be using the Editor for this Tutorial but instead doing everything by script. And then further we will be defining a C++ class that will do most of the game logic.
We will be defining a Torque class named CaGame for the Torque script. Edit the level file just created with your favorite editor (we use Torsion), add a parameter named CaGame to the t2dSceneGraph instantiation as in
%levelContent = new t2dSceneGraph(CaGame)
Then change the camera size parameters to
cameraSize = "64 96";
Background Information
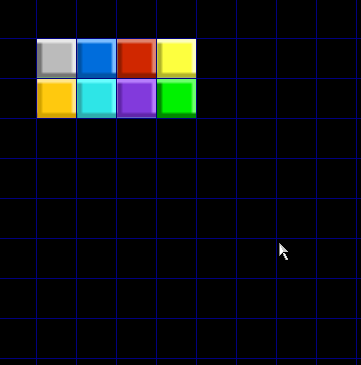
Drag this image from your browser and save it as blocks.png in your /game/data/images folder:
![]()
This image contains the building blocks for our CA game.
Create a file named CaGame.cs in your /game/GameScripts folder and define a datablock instance for the previous image:
      new t2dImageMapDatablock(CaImageMap) {
      imageName = "~/data/images/blocks.png";
      imageMode = "CELL";
      frameCount = "-1";
      filterMode = "SMOOTH";
      filterPad = "0";
      preferPerf = "0";
      cellRowOrder = "1";
      cellOffsetX = "0";
      cellOffsetY = "0";
      cellStrideX = "0";
      cellStrideY = "0";
      cellCountX = "-1";
      cellCountY = "-1";
      cellWidth = "16";
      cellHeight = "16";
      preload = "1";
      allowUnload = "0";
   };
Note that we are using CELL as image mode and every cell has a dimension of 16x16, which divides our blocks.png image in 8 square blocks, of different colors.
Create the CaGame script class
Now we will be creating the Torque class where all our CA rendering is called from. First we add a constructor and destructor. Add these 2 functions to the file CaGame.cs
function CaGame::OnAdd(%this)
{
   setScreenMode( 640, 960, 32, false );
   %this.CreateTileLayers();
   %this.DrawGrid();
}

function CaGame::OnRemove(%this)
{

}
We define 2 methods for the class: CreateTileLayers and DrawGrid. Here is the definition of CreateTileLayers.
function CaGame::CreateTileLayers(%this)
{
    %tileMap = %this.getGlobalTileMap();
    %tileCountX = 16;
    %tileCountY = 24;
    %tileSizeX = 4;
    %tileSizeY = 4;
    %this.WallTileLayer = %tileMap.createTileLayer( %tileCountX, %tileCountY, %tileSizeX, %tileSizeY );
    %this.WallTileLayer.setSize( %tileCountX * %tileSizeX, %tileCountY * %tileSizeY  );
    %this.WallTileLayer.setGridActive( 1 );
    %this.WallTileLayer.setPosition( 0, 0 );
}
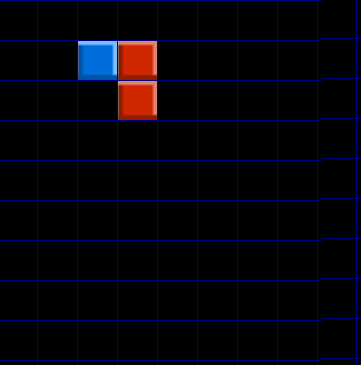
We use the createTileLayer function to create a t2dTileLayer instance. To draw the tile we use setStaticTile. setStaticTile parameters are the X coordinate of the tile to set , the Y coordinate of the tile to set, the imagemap to set the tile, and the frame of the imagemap to use. To test our tiles, we defined a DrawGrid function that draws each frame of the imagemap at a different coordinate.
function CaGame::DrawGrid(%this)
{
   %this.WallTileLayer.setStaticTile( 1, 1, CaImageMap, 0 );
   %this.WallTileLayer.setStaticTile( 2, 1, CaImageMap, 1 );
   %this.WallTileLayer.setStaticTile( 3, 1, CaImageMap, 2 );
   %this.WallTileLayer.setStaticTile( 4, 1, CaImageMap, 3 );
   %this.WallTileLayer.setStaticTile( 1, 2, CaImageMap, 4 );
   %this.WallTileLayer.setStaticTile( 2, 2, CaImageMap, 5 );
   %this.WallTileLayer.setStaticTile( 3, 2, CaImageMap, 6 );
   %this.WallTileLayer.setStaticTile( 4, 2, CaImageMap, 7 );
}
The previous code generates the following image
Cellular Automata
Cellular automata are computer programs that self-generate images based in a model where a grid of cells is defined and iterated. Each cell has a finite number of states and at each iteration, each cell's state is defined accordingly to his neigbour cells. Here is an example of a rule using the previous Torque grid of tiles to generate the images:
-
Define an initial condition where a cell has state number 1 and 2 neighbour cells have state number 2. The graphic representation of this grid using the Torque class CaGame is a tile with blue color (frame 1 in the imagemap) and 2 tiles with red color (frame 2).
-
The rule is that at each iteration if a cell has 2 neigbours with a higher state then increases its state by 2. The result of this rule would be the image in the right side, where the blue tile (state 1 or frame 1) turned to state 3 (frame 3).
 |
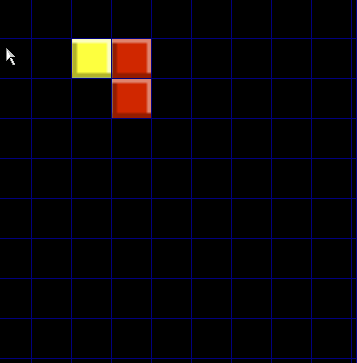 |
Defining the C++ game logic
So we need a model to generate our self generating Torque tiles at each program iteration. We will be defining this model in C++ and integrate it with our Torque class. To define our model, create 2 files: ca.h and ca.cpp. The contents of ca.h are:
#ifndef _CA_MODEL_H_
#define _CA_MODEL_H_

#ifndef _SCRIPTOBJECTS_H_
#include "console/scriptObjects.h"
#endif

#define BLOCK_GRID_XSIZE 16
#define BLOCK_GRID_YSIZE 24

#define ON   1
#define OFF -1

class CaModel : public ScriptObject
{
   typedef ScriptObject Parent;

public:
   CaModel();
   bool onAdd();
   void onRemove();

   DECLARE_CONOBJECT(CaModel);

   int size_x;
   int size_y;
   int value[BLOCK_GRID_XSIZE][BLOCK_GRID_YSIZE];
   int v[BLOCK_GRID_XSIZE][BLOCK_GRID_YSIZE];
   int get_value( int x, int y );
   void set_value( int i, int j, int N );
   void apply_rule();

protected:
    int state;
    int N, S, E, W, NE, NW, SW, SE;
    void VonNeumann_neighbourhood( int i, int j );
    void Moore_neighbourhood( int i, int j );
    virtual int rule( int i, int j );
};

#endif
Our grid is defined as a two-dimensional C array of integer values, the states of the cellular automata.
int value[BLOCK_GRID_XSIZE][BLOCK_GRID_YSIZE];
We further define functions to get and set the value of each grid cell
int get_value( int x, int y);
void set_value( int i, int j, int N );
The implementation of the class is made in the file ca.cpp:
#include "platform/platform.h"
#include "console/simBase.h"
#include "console/consoleTypes.h"
#include "console/simBase.h"
#include "math/mRandom.h"

#include "blocks/ca.h"

IMPLEMENT_CONOBJECT(CaModel);

CaModel::CaModel()
: ScriptObject()
{
    int i;
    int j;

    size_x = BLOCK_GRID_XSIZE;
    size_y = BLOCK_GRID_YSIZE;
    for( int i = 0; i < size_x; ++i )
    {
        for( int j = 0; j < size_y; ++j )
        {
            value[i][j] = v[i][j] = OFF;
        }
    }

}

bool CaModel::onAdd()
{
    if (!Parent::onAdd())
        return false;

    return true;
}

void CaModel::onRemove()
{
    Parent::onRemove();
}


int CaModel::get_value( int i, int j )
{
    if( i < 0 || i >= size_x || j < 0 || j >= size_y )
        return -1;
    return value[i][j];
}


void CaModel::set_value( int i, int j, int N )
{
    if( i < 0 || i >= size_x || j < 0 || j >= size_y )
        return;
    value[i][j] = N;
}

void CaModel::apply_rule()
{
    for ( int i = 1; i < size_x - 1; i++ )
    {
        for ( int j = 1; j < size_y - 1; j++ )
        {
            v[i][j] = rule( i, j );
        }
    }

    for ( int i = 0; i < size_x; i++ )
    {
        for ( int j = 0; j < size_y; j++ )
        {
            value[i][j] = v[i][j];
        }
    }


}

void CaModel::VonNeumann_neighbourhood( int i, int j )
{
    state = value[i][j];
    N = value[i-1][j];
    S = value[i+1][j];
    W = value[i][j-1];
    E = value[i][j+1];
}

void CaModel::Moore_neighbourhood( int i, int j )
{
    VonNeumann_neighbourhood( i, j );
    NW = value[i-1][j-1];
    SE = value[i+1][j+1];
    NE = value[i-1][j+1];
    SW = value[i+1][j-1];
}


int CaModel::rule( int i, int j )
{

    return OFF;
}
The class constructor sets the grid to an initial state of OFF, that was defined as -1. This is convenient to use in our Torque imagemap rendering, since the frames are numbered from 0 to 7. So, a value of -1 does not need to be drawn at all. The heart of the CA engine is in the function apply_rule, where each grid cell is instantiated as the return value of a function named rule, where our rule is to be defined. Our class defines this rule as to return OFF. This is because we will use this class as a C++ base class for the CA engine, where descendent classes will implement their own rule function. The functions VonNeumann_neighbourhood and Moore_neighbourhood are utility functions that inspect the grid neighbours of a cell.
John Conway's Game of Life
The Game of Life is a cellular automaton devised by the British mathematician John Conway in 1970. Each cell has 2 states: ON and OFF. Every cell interacts with its eight neighbours, which are the cells that are horizontally, vertically, or diagonally adjacent (this is called a Moore neighbourhood). The rules of the CA are:
- Count the number of ON neighbours of each cell.
- If this number is exactly 2, the cell keeps its current state
- If this number is exactly 3, the cell turns to ON (as if by reproduction)
- Any other number of ON neighbours cause the cell to die (OFF), as if by under-population or overcrowding.
Here is our implementation of this rule, in a file calife.cpp:
#include "platform/platform.h"
#include "console/simBase.h"
#include "console/consoleTypes.h"
#include "console/simBase.h"
#include "math/mRandom.h"

#include "blocks/ca.h"
#include "blocks/calife.h"

IMPLEMENT_CONOBJECT(CaLife);

CaLife::CaLife(): CaModel()
{

}

bool CaLife::onAdd()
{
    if (!Parent::onAdd())
        return false;

    return true;
}

void CaLife::onRemove()
{
    Parent::onRemove();
}


int CaLife::rule( int i, int j )
{
    int sum = 0; //neigbours
    int cell;

    Moore_neighbourhood( i, j );
    if ( N == ON ) sum++;
    if ( S == ON ) sum++;
    if ( E == ON ) sum++;
    if ( W == ON ) sum++;
    if ( NE == ON ) sum++;
    if ( NW == ON ) sum++;
    if ( SW == ON ) sum++;
    if ( SE == ON ) sum++;

    if ( sum == 2 ) cell = state; //keep same state
    else if ( sum == 3 ) cell = ON;
    else cell = OFF;
    return cell;
}

ConsoleMethod( CaLife, get_value, S32, 4, 4, "get_value( int x, int y )" )
{
    int i, j;
    i = dAtoi( argv[2] );
    j = dAtoi( argv[3] );
    return object->get_value( i, j );
}

ConsoleMethod( CaLife, set_value, void, 5, 5, "set_value( int x, int y, int N )" )
{
    int i, j, N;
    i = dAtoi( argv[2] );
    j = dAtoi( argv[3] );
    N = dAtoi( argv[4] );
    object->set_value( i, j, N );
}

ConsoleMethod( CaLife, get_size_x, S32, 2, 2, "get_size_x()" )
{
    return object->size_x;
}

ConsoleMethod( CaLife, get_size_y, S32, 2, 2, "get_size_y()" )
{
    return object->size_y;
}

ConsoleMethod( CaLife, apply_rule, void, 2, 2, "apply_rule()" )
{
    object->apply_rule();
}
We defined ConsoleMethod macros that will allow Torque script to interact with our C++ class. The functions are the set and get methods, functions to return the grid dimensions and a function that will call the CA iteration.
Putting it all together
Now we are going to integrate our C++ code to be called by Torque. To do this we define a new member variable to our Torque class
%this.model = new CaLife();
All the C++ defined methods will be called from %this.model. The new OnAdd function is defined as
function CaGame::OnAdd(%this)
{
setScreenMode( 640, 960, 32, false );
%this.model = new CaLife();
%this.CreateTileLayers();
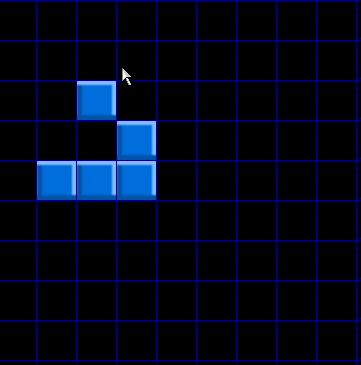
%this.model.set_value( 2, 2, 1);
%this.model.set_value( 3, 3, 1);
%this.model.set_value( 1, 4, 1);
%this.model.set_value( 2, 4, 1);
%this.model.set_value( 3, 4, 1);
%this.DrawGrid();
}
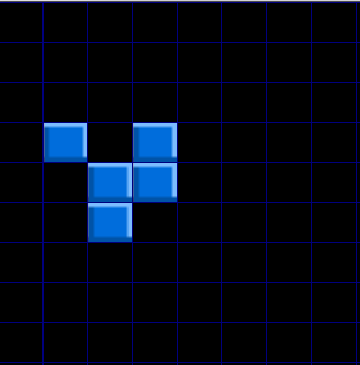
We use the set_value method of our CA class to set some cells. Not any random cells, but a pattern known as Glider, a type of patterns that translate themselves across the board. The rendering of our initial Glider produces the following image
Here is our new definition of DrawGrid
function CaGame::DrawGrid(%this)
{
   for ( %x = 0; %x < %this.WallSizeX; %x++)
    {
       for( %y = 0; %y < %this.WallSizeY; %y++)
       {
          %value = %this.model.get_value( %x, %y );
          if ( %value >= 0 )
          {
             %this.WallTileLayer.setStaticTile( %x, %y, CaImageMap, %value );
          }
          else
          {
             %this.WallTileLayer.clearTile( %x, %y );
          }
      }
    }
}
The function iterates the grid 2D array and gets the cell state from the CA model corresponding to a position. Then the integer value is used to set the frame in the call to setStaticTile. If the value is OFF, then we use clearTile to clear the tile.
Setting motion
Now we need a way for the user to interact with the game. We will define an ActionMap object that will bind to 2 keyboard keys, right and left. The right key will advance the CA step by step. The left key will put the CA in iterative self replicating mode. Here is the defintion of the ActionMap:
function CaGame::onLevelLoaded( %this, %scenegraph )
{
   new ActionMap( CaActionMap );
   CaActionMap.bindCmd( keyboard, "right", "CaGame.PlayerMovement( right );", "" );
   CaActionMap.bindCmd( keyboard, "left", "CaGame.PlayerMovement( left );", "" );
   CaActionMap.push();

}
function CaGame::PlayerMovement( %this, %direction )
{
    switch$( %direction )
    {
        case "left":
        %this.ApplyRule();

        case "right":
        %this.DrawGrid();
        %this.model.apply_rule();
    }
}
function CaGame::ApplyRule(%this)
{
   %this.DrawGrid();
   %this.model.apply_rule();
   %this.schedule( 1000, ApplyRule );
}
When the right key is pressed, the grid is drawn and the model's rule is called, that produces a new CA generation. Pressing the left key calls a function ApplyRule that calls itself every second, drawing the grid and defining a model new generation at every iteration. The result of one time step is shown below
Mouse input
In TGB, mouse events are Scene Window specific. The default Scene Window in TGB is called SceneWindow2D. We could change the sceneWindow2D::onMouseDown mouse event callback function to suit directly our CaGame class, but if later we define another Torque script class that needs mouse input, we would have to deal each case, since sceneWindow2D::onMouseDown is a global function. Since tile layers are t2dSceneObject instances we can instead use the Torque feature of allowing to add custom mouse callbacks for these type of objects. To do this, we have to modify out tile layer instantiation to:
%this.WallTileLayer = new t2dTileLayer()
{
   class = "TileLayerCaGame";
};
%this.WallTileLayer.setUseMouseEvents( true );
and use
%tileMap = %this.getGlobalTileMap();
%tileMap.addTileLayer( %this.WallTileLayer );
to add the tile layer to the tile map. Also we have to define a custom class for the tile layer to handle mouse events:
function TileLayerCaGame::onMouseDown( %this, %mod, %worldPos, %mouseClicks )
{
   CaGame.pickModelTile( %worldPos );
}
This function then calls a new function pickModelTile that uses world coordinates and the t2dTileLayer function pickTile to assign the grid value to the C++ model and redraw the grid:
function CaGame::pickModelTile( %this, %worldPos )
{
   %tile = %this.WallTileLayer.pickTile( %worldPos );
   %x = getWord( %tile, 0 );
   %y = getWord( %tile, 1 );
   %this.model.set_value( %x, %y, 1);
   %this.DrawGrid();
}
Using our newly defined mouse event, we can now set the grid cells by clicking on each grid square. Here is an example of a CA set with the Toad pattern, that goes back and forth in the images shown. For more examples of patterns see here


