|
WIKIFIXI: OpenOffice Doc to Wiki Format Converter Macro
by: Spider
Note: This was created with OpenOffice 1.1.4
This file contains a macro which will do a basic conversion of a .sxw (OpenOffice text document) file into into the TDN wiki format. OpenOffice (www.openoffice.org) is a free, open source, and full featured word processor that can load in MSWord (and many other) formats. The macro in this document should save you quite a bit of time, even if it doesn't convert absolutely everything in your document perfectly. Running the macro creates a new document that is in wiki format.
Supported Formatting:
- Headers 'h_' defined by font size in document
- Bold, Italic, Underline
- Line Breaks defined by line break or new paragraph in document
- Code converted to 'pre' tags, defined by text in tables in document
- Images converted to image tags
- Horizontal rules
Unsupported Formatting:
- Text Boxes are ignored
- All tables are converted to 'pre' tags, so any multi-celled or other tables will look like code
- Form items such as buttons and drop-downs and whatnot
Default Settings:
- isStandard (default: true) puts your doc in a ContentStandard template
- isWIP (default: true) puts a Work In Progress template at top of your document
- ImageType (default: “.jpgâ€) assumes your images are jpg
- mydocimagesname (default: “_MyDocImagesName_â€) root name for all images
- h1size (default: 16) fonts of this size are considered 'h1'
- h2size (default: 14) fonts of this size are considered 'h2'
- h3size (default: 0 means unused) fonts of this size are considered 'h3'
- h4size (default: 0 means unused) fonts of this size are considered 'h4'
How To Use The Macro The Quick and Easy Way
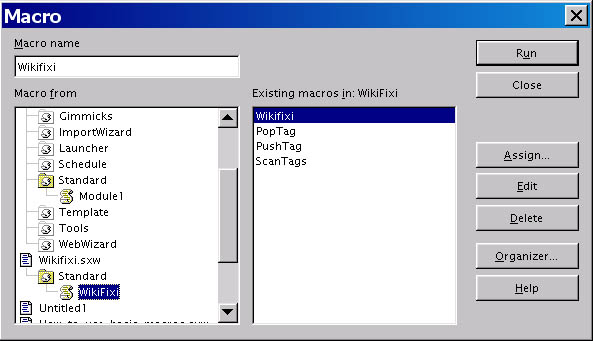
First, open this file. Second open the file you want to convert, keeping this one open as well. In the Tools menu in your file, select Macros>Macro... A dialog will come up. In the Macro from tree, scroll down to Wikifixi.sxw, double-click and you'll see a standard folder, double-click on that and you'll see the WikiFixi macro. Click on it, and hit the Run button. A new document will open, process for a while, and boom... yer done. You can save the new doc as a text file and reload it if you want to see it looking more like plain text. The final step is for you to replace “_MyDocImagesName_†with the names of the images in your document. By default, the macro makes them sequentially: _MyDocImagesName_01.jpg, _MyDocImagesName_02.jpg etc.
How to Put This Macro in your Open Office Library and Make it a Button
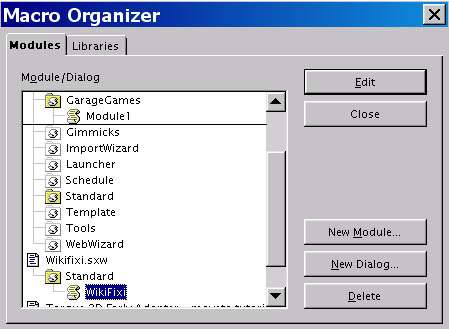
Open the Tools>Macros>Macro... dialog again. This time, click the Organizer... button. You'll see a similar tree to the previous dialog. Go to the Libraries tab. Click on new and enter “Garage Games†(or whatever you want, really) into the text box. Now, go back to the Modules tab and into Wikifixi.sxw>Standard and you should be able to drag the Wikifixi module up into the Garage Games library. It is now available in there without this document having to be open. In fact, for some strange reason, there's no way to copy the macro, so it is now removed from this document!(?)
To create a button, right click on a toolbar and select Customize... On the left, in the Available Buttons tree, expand OpenOffice.org BASIC Macros>Garage Games>Wikifixi and you'll see the Wikifixi macro in the list. Select it and click the Add button. If you click on the Icons button, you can make it look like a ghost or a jack-o-lantern or whatever.
How To Change The Default Settings
In that same Tools>Macros>Macro... dialog that you run the macro from, you may have noticed that there's an Edit button. Selecting Wikifixi and clicking that will bring up the OpenOffice BASIC IDE. If you scroll down a bit, you'll see this section of code:
 REM SETTINGS
 	isSTANDARD = 1 rem true puts Template Standard tags around document
 	isWIP = 1 rem true puts WIP tag at beginning
 	ImageType = ".jpg" rem if you have multiple types you'll have to diy
 	mydocimagesname = "_MyDocImagesName_"
 			rem puts images in document as _DocImagesName_##[ImageType]
 	REM Headings are determined by font size in your document
 	REM note: the wiki wants you to start at 'h1' with your main title for auto contents.
 	REM it bases the sections in the contents on your 'h' tags, so do use them
 	h1size = 16 rem from 16 up
 	h2size = 14 rem from 14 to 15
 	h3size = 0 rem zero means don't use
 	h4size = 0 rem zero here means don't use
Let's go through these. The isStandard and isWIP flags are pretty simple... they just set whether or not to use the TemplateStandard and Work In Progress templates. The next two: ImageType and mydocimagesname determine what the macro puts into the image tags that replace graphics in your document, as explained above. The h#size variables are what font sizes the macro looks for to determine header tags. As you can see, the comments here pretty much explain how to use this stuff.
Best Methods for Formatting Your Document for Use With Wikifixi
There are a few tricks you can use that will make working with Wikifixi go a lot more smoothly. First, don't use any features that the macro doesn't support. For example, if you want to make a graph or something, use an image instead of a built in word processor object. Remember that headers, footers, and text boxes don't work. Only change font sizes for section headings. Tables will not be converted, but all the text in them will be put between code tags, so you can fix them up yourself in a manner you see fit. Paragraph justification is not supported... everything is left justified on the wiki.
Images: If you select (left click) an image in Open Office, then right click on it, you'll get a menu of options. Expanding the Anchor menu, select As Character. This makes the placement of your image much more accurate when converted to wiki format. It can be quite unpredictable if you don't do this. Also, when naming your image files, it makes things faster to name them the way the macro converts them. Something like this: ExplosionTutorial01.jpg, ExplosionTutorial02.jpg, ExplosionTutorial03.jpg etc. Number them in the order they appear in the document. Also remember that you want to name them something descriptive because all images in the wiki are stored in the same place. So, “Image01.jpg†is not a good choice. I've found that linking images is a little wonky in OpenOffice, so I make a point of always embedding them. To do this, just unclick the link checkbox when you insert graphics.
Code: Code is very simple... just paste it into a single-celled table like the one above. Also note that the wiki will automatically treat any indented text as code. I'm still not sure that's a great feature, but that's how it is. For very long (longer than a page) code segments, I've found that the best way to make them look right in both document and wiki format is to put them in whole-page sized table cells without any line breaks between the cells. This will all show up as a single code segment on the wiki, and will also divide properly between pages in your document.
Line Breaks: All line breaks and paragraph breaks will be converted into a single line break ('br') tag. This can yield some unpredictable results if you have OpenOffice set up to automatically put space between paragraphs. To change this option in OpenOffice, select your entire document, then select Format>Paragraph... from the menu and change the Above paragraph and Below paragraph values to zero, then click OK. This will make the paragraph breaks in your document look like the output that wikifixi creates. Your text will be more readable if you put an extra line break between paragraphs.
If you run the macro on this document, you can see most of the features of wikifixi.
Note: this page was created directly from the Wikifixi.sxw document using the wikifixi macro.
|


