


Image:MatEd.jpg
From TDN
| Orientation | Normal |
|---|---|
| Horizontal resolution | 72 dpi |
| Vertical resolution | 72 dpi |
| Software used | Adobe Photoshop CS Windows |
| File change date and time | 10:21, 28 June 2005 |
| Color space | sRGB |
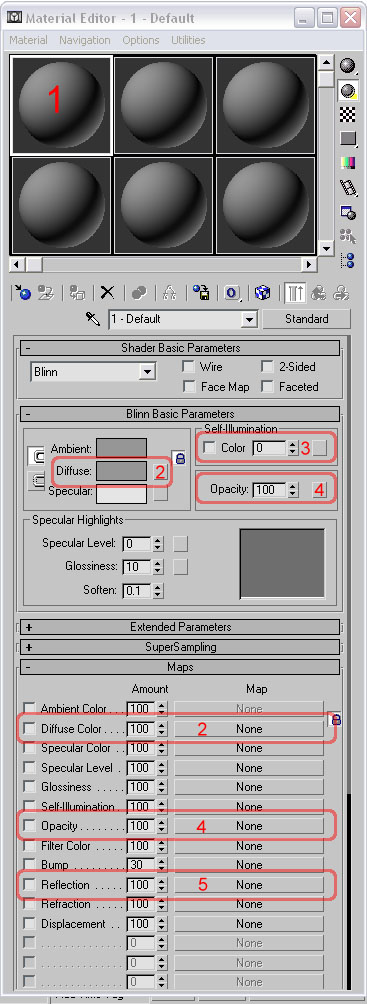
1 - Material slot. Each of these is a seperate material.
2 - Diffuse Channel. Diffuse (color) bitmap textures are assigned to a material by clicking on the map channel button that says "none" next to the diffuse entry in the maps rollout. From there click on the bitmap option in the map rollout window and then browse to the location where the JPG or PNG texture that you wish to apply is located and then press OK.
3 - Self Illumination spinner. At 0-99, self illumination is disabled, at 100 it is enabled. Self Illumination prevents the model from recieving shadows ingame.
4 - Opacity channel. For opacity on a model, you can use the spinner to set an opacity level for the whole material, or assign a bitmap to it and change Mono Channel Output on the bitmap's properties to Alpha.
5 - Reflection Channel. Used to control Environment Mapping strengthLike Opacity channel, can use either the reflection spinner (check the checkbox) or a bitmap with Mono Channel Output set to alpha to control
File history
Legend: (cur) = this is the current file, (del) = delete
this old version, (rev) = revert to this old version.
Click on date to see the file uploaded on that date.
- (del) (cur) 16:55, 29 June 2005 . . Chemeleon (130212 bytes) (1 - Material slot. Each of these is a seperate material. 2 - Diffuse Channel. Diffuse (color) bitmap textures are assigned by clicking the button, selecting bitmap, and then picking the jpg or png texture to use. 3 - Self Illumination spin)
- Edit this file using an external applicationSee the setup instructions for more information.
Links
The following pages link to this file:
