From TDN
The exporter user interface

Overview of the four tabs
|
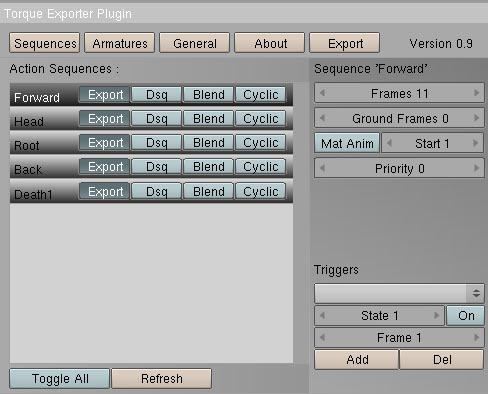
Along the top of the exporter user interface you will see the four tab
buttons. Each button will display a different page of options when
pressed.

(tab buttons shown highlighted in red)
(from left to right)
- Sequences - the sequences page is where you will choose which
animations you wish to export and configure the options for each
animation.
- Armatures - the armatures page is where you can choose which
bones you wish to exclude from the export, if any.
- General - the general page is where you will configure general
options for the export, including the output folder, Triangle
Stripping, Cluster Mesh, and billboard options.
- About - Exporter credits
The export button to the right of the tab buttons will export your
model and animations with the current settings.
|
|
|
The Sequences tab
Sequence List options
|
On the left you see the sequence list, titled "Action Sequences".
Each action that you create in Blender will show up in this list.
Next to each action name, you will see four buttons:

(from left to right)
- Export - if this button is pressed, the action will be exported
as a
sequence.
- Dsq - if this button is pressed, the sequence will be exported in
a
separate .dsq file, and will not be contained within the .dts.
The advantage of separating your animations from your model is that you
can reuse those animations on another model that contains the same bone
(node) structure.
- Blend - if this button is pressed, it causes the action to be
exported as a "Blend" sequence. A blend sequence is additive in
nature. More on this in the
next section.
- Cyclic - if this button is pressed, it causes the exported
sequence
to play in a loop.
|
|
|
Other Sequence options
|
To the right of the sequence list, you will see the following options:
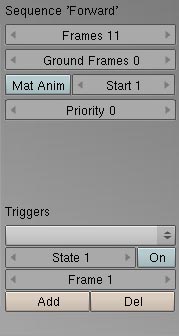
(Top: Sequence options, Bottom: Triggers options)
(from top to bottom)
- Frames - Here you can set the number of frames to be
exported.
The exporter samples your animations at certain frames in order to
export them. This setting tells the exporter how many samples to
take. It defaults to the number of frames in your animations (one
frame exported for each frame in your animation). You can
decrease this value to save space, but your animations may lose
precision.
- Ground Frames - Ground frames are used by the engine to sync a
player's animations with their movement speed, as well as to orient the
player to the ground when required. For example, if the player dies on a slope, ground frames in the death animation make sure that he conforms to the ground after he is dead. In order to use ground frames, you must have an object in your scene
called "Bounds" (preferably a mesh object, but any type should
do). The bounds object does not need to be parented to anything,
the exporter will find it by name. This bounds object is used as
a reference point for the actual ground the player is standing on
in-game. Setting the ground frames to a number greater than 0
will cause ground frames to be exported for the selected animation.
- Material Animation ("Mat Anim") - this option is used to
export material animations. As of exporter version 0.90, visibility
animations (alpha) are the only type of material animation
supported. The "Start" spinner to the right of the Mat Anim
button chooses the starting frame for the visibility animation.
- Priority - This setting lets you assign a priority to the
currently
selected animation. If two or more animations that effect the
same bones are played at the same time, the one with the highest
priority will gain control of the disputed bones.
|
|
|
Trigger Options
|
The trigger options allow you to export "animation triggers" along with
your animation. Each trigger can effect a trigger state, turning
it either on or off.
(from top to bottom)
- Trigger pull down - this allows you to select any of the
available
triggers in order to adjust their properties.
- State - this will allow you to select which "state" the
trigger will effect. In torque the trigger states are numbered
between 1 and 32. Some trigger states have a specific meaning in
the engine. The button next to the trigger labeled "On" allows
you to choose the state's new value.
- Frame - The frame of the animation on which the trigger activates
in
order to change one of the trigger states.
- Add and Del - These buttons allow you to add a new trigger, or to
delete the selected trigger.
|
|
|
Blend Animation Options
|
If you set an animation to be exported as a "Blend" sequence, a new set
of options will appear on the right hand side of the sequence page.
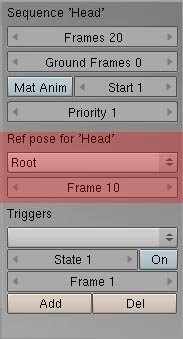
(Blend animation options highlighted in red)
These two options allow you to select an action and frame to be used as
the "reference pose" for your Blend animation. The Blend
animation is then exported relative to that pose. For instance,
if the reference pose is the same as a frame of the blend animation,
that would be written out as no change in location, rotation, or
scale. You can think of the reference pose as having been
subtracted out. When blend animations are played in the engine,
they are "overlaid" on top of the current pose of the character.
The blend animations add to the current pose.
|
|
|
The Armatures tab
|
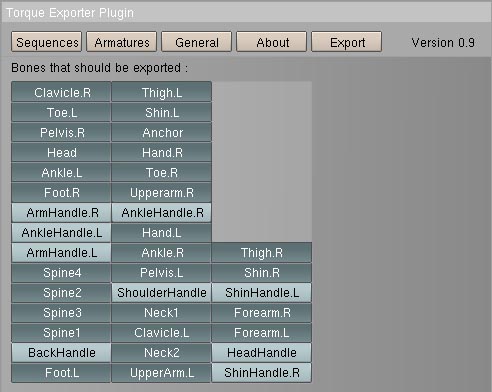
The armatures tab contains a list of bones. If the button for a
particular bone is pressed, it will be exported. If the button is
not pressed, the bone and all of it's child bones will be excluded from
the export.
|
|
|
The General Tab
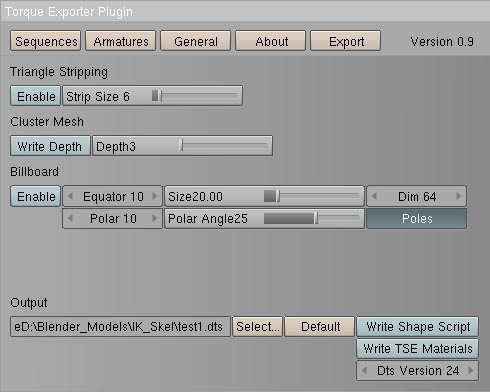
The General tab of the exporter contains the following options:
(from top to bottom)
Triangle stripping
Cluster Mesh
Billboard

|
These options allow you to export a dts shape with an
"auto-billboard"
detail level. What this means is that your model will be replaced
with a flat "billboard" picture of the model in one of your detail
levels (usually the lowest one). The Billboard options are as
follows:
|
|
|
Output options

- The first option on the left allows you to select which
folder you would like the exported files to be written to. Any
.dts, .dsq, and log files will also be written to this folder.
- Default output path button - When pressed, this button will reset
the output path of your .dts file to the same folder that the current
blend file was opened from (or saved to).
- Write Shape Script button - When selected, this option will cause
the exporter to output a small .cs (torquescript) file that ties your
shape in with any exported .dsq animations. Unless your shape is
static (without animations), you will eventually need a shape script to
play your animations in Torque.
|
|
 |
|
 |
|
Note
In version 0.90 of the exporter, having an incorrect output path will cause the exporter to fail with a Python script error. If you experience an exporter crash, please double check your output path before posting a bug report. This issue will be resolved in the next exporter release. |
|
 |
|
 |
|
- Write TSE Materials button - When selected, this option causes
the exporter to write out a TSE (Torque Shader Engine) material
script.
- Dts Version spinner - Selects the Dts file version to
export.
Dts version 24 is the default. Version 25 of the dts format
includes support for morph (vertex) animations. Unfortunately,
this is currently not supported in version 0.90 of the exporter.
|
|
|
|
|
|
Note
Currently in version 0.90 the generated material script is just a blank template. |
|
|
|
|
|


