Constructor/Reference/MaterialsForm
From TDN
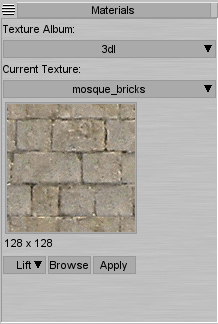
Materials in Constructor are accessed through the Materials Form. It looks like this:
Albums
The first thing you see at the top is the Texture Album dropdown. All of your textures will be arranged into Albums. You can not have a texture that is not in an album.
Constructor comes pre-installed with several albums of textures for your use.
Textures
The second dropdown list lets you choose a texture in the selected album to be the active texture. The active texture is the one that you can apply to a selection. This is the only way to apply texturesto faces.
Below that is a small (or sometimes enlarged) version of the selected texture, and below that is the size of the texture. You can switch the unit of measurement between pixels and meters. It is an option in the corner menu in the upper left of the form.
As with all textures in Torque, every texture file has to be a .jpg or a .png and must have power-of-two dimensions.
Lift and Apply
When you have a brush or a face selected, click the Lift button and it will drop down a list of the textures that are currently applied to the selection. Click one of the textures in the list to make it the currently active texture.
When you have a sweet texture as the active texture, and you have your sweet model selected, click apply to put it all together. You can have faces or brushes selected. If you have brushes selected, every face will get the texture applied to it. Keep this in mind if you have two-sided walls or if you're using null textures on the backfaces.
Browse
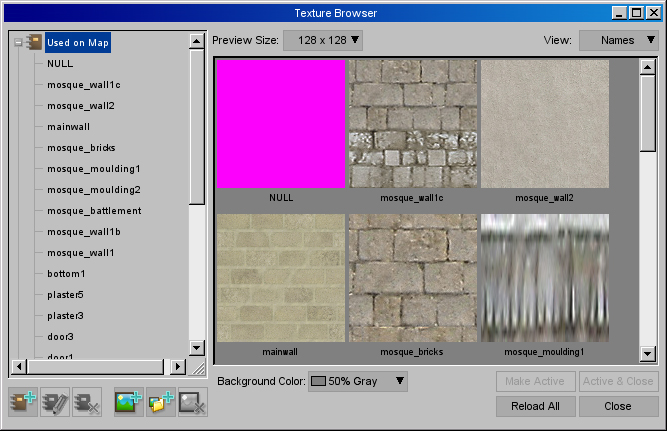
Besides using the dropdown menus listed above, you can also choose the active texture in the Texture Browser window. It comes up when you click Browse. It looks like this:
The Texture Browser
On the left is the list of albums and textures. The top album is a special album that cannot be deleted called "Used on Map". It shows all the textures that are currently assigned to at least one face in the current scene. It doesn't always stay updated with all the changes. To manually update it, select Clean Up 'Used on Map' Album from the Materials menu.
The rest of the albums can be deleted, and you can create your own.
Across the bottom underneath the texture list, the buttons are:
Add a New Album - adds a new album.
Rename the Selected Album - rename the selected album.
Delete the Selected Album - deletes the selected album. It will ask you to confirm.
Add Texture to Selected Album - browse your hard drive for a texture to add to the current album. If you're using Windows, I highly recommend making sure that your textures are on the C drive, the boot drive, and/or the drive that Constructor is installed on. Constructor seems to have trouble crossing disks.
Add all textures in a directory to the selected Album - just what it says. Sometimes this won't work. I think every file in the folder must be a power-of-2 jpg or png, or it will choke. Or I might have made that up.
Delete the selected texture - deletes the selected texture. It will ask you to confirm.
When you have selected an Album
Across the top and at the bottom you can choose some options on how to view the image section of the Browser. Pretty self explanatory. You can look through the thumbnails of the album and when you click one, the Browser will select it for you in the list at the left, and show it in the image section.
When you have selected a texture
You'll have some web-like controls at the top.
Back goes back to the album
Previous goes to the previous texture in the album
Next goes to the next texture in the album
Copy to Album lets you copy the texture to another album.
At the bottom right:
Make Active makes the currently shown texture the active texture in the scene.
Active and Close makes the shown texture active and closes the Texture Browser in one click. Handy!
Reload All crashes Constructor.
Close closes the Texture Browser.


